So here we are. About 5 months late. I planned to write this review back in January, but a mix of pandemic, work-related, and family matters have resulted in some time-management issues. Nevertheless, we are now back on track.
The whole Idea
As the story goes, in late 2020, I decided to check out some aluminum T-Slot-based sim racing rigs, as a replacement for my trusted tube frame chassis. While these steel tube frames were doing a fine job, and certainly looked good, it became apparent that they did not really suit my needs, as I am constantly testing gear and fiddling with custom hardware. Furthermore, I am also a user of the brilliant Next Level Racing V3 motion platform, and it has often proven to be a pain to implement when using an out-of-the-box pre-assembled sim racing chassis.
This is where the T-Slot interest originated. Talking to some of my sim racing friends who already made the jump to custom build profile rigs, it more and more started to become clear that this was the way to go, if I wanted an easy way to adjust my racing rig to my likings and needs.
After looking at several solutions, provided by a number of sim racing brands, a few made the selection. That said, none of them provided me with all the extras I had in mind, and the idea that I wanted to build a full custom setup became more apparent. While I could have sourced all the basic materials myself, it seemed a no-brainer to start with a basic pre-designed cockpit and go from there.
What does it cost?
As far as cost goes, I literally had no clue, as I was planning to design and adjust the rig not before, but during the build process. As I wanted to start the build with a basic package, I looked at the various prices and noticed minor differences. The price of an out-of-the-box T-Slot configuration heavily depends on the included accessories. Yet not all of the included options were to my liking which made me decide to go for a bog-standard starting kit.
You don’t have to be an engineer to realize that a basic T-Slot rig is nothing more than a few industry standard aluminium extrusion profiles, a pedal plate and a wheel mount.
This brought the GT Omega Prime Cockpit to my attention. It seemed like a sturdy, cost effective choice to start my project.
The Scotland-based company has made an international name for itself, retailing wheel stands, sim racing cockpits, and gaming seats since the early days of sim racing. Since the birth of the Bsimracing website, I have owned both the old discontinued GT Omega Pro cockpit and the GT Omega Pro ART cockpit. Both entry-level budget cockpits were very nice products for their price, and I have had nothing but positive experiences with the company and its products as far as delivery and service were concerned. So why not check out their effort.
Things even got better when GT Omega offered me a Prime Cockpit review unit. Needles to say, I was not obligated to advertise this cockpit, and I am allowed to speak my mind and share my personal thoughts on the product.
How do you review something that is 85% industry standard?
That brings us to the following question. What is a T-Slot rig? The answer is simple. A selection of industry-standard extruded aluminum profiles sourced from an established manufacturer, with added custom accessories to mount a wheel, pedals, and in most cases a shifter or handbrake.
This fact makes it somewhat strange when reviewing a T-Slot rig. You can only say what has been said a thousand times already. Most aluminum profiles are nearly identical. Granted they come in different sizes and thicknesses, and they can have a certain groove depth or color, but apart from that, we will always be talking about roughly the same materials. From a sim racing perspective, the small differences would not even matter, as just about every product on offer is capable of handling the tensions and weights that come into play. We are not building a rocket platform after all.
That leaves us with the accessories that turn the standard profiles into a racing rig. While most companies offer their own custom solutions, when it comes to wheel plates, steering mounts, and brackets, just about every product on the market can handle its purpose without a problem.
The proof is in the pudding.
The best way to find out if something is good or bad is to test it yourself. While the internet is a good source of information, it does not always provide you with the bare facts when it comes to product introductions.
The past few months I have looked at a number of T-Slot reviews that were trying to convince their audience that one random solution is way better than another. Since the basic idea behind a profile rig is virtually the same for every design out there, reviewers often try to color their videos or write-ups by nitpicking and over-exaggerating certain unimportant details of a T-Slot rig.
I have seen multiple examples of reviews that made me raise an eyebrow. Going from, I cut my finger on the profile, to I am comparing the thickness of a 40/40 or 80/40 profile to an industrial heavy-duty lifting solution. The T-Slot rig accessories are also often reviewed with the bag of salt handy, ready to be used. I have seen reviews stating that a 5mm carbon steel plate would not be sufficient to mount sim racing pedals. I have heard reviewers say the welds on their steel plates were not strong enough? One even managed to state that I quote ” the rubber feet are not rubbery enough”.
On the lowest side of the review chart, I have even seen people loosen screws to convince their audience that there was flex in a review product, while then comparing it to their similar favorite or sponsored product. Nuts and bolts all nicely tight and snug of course…
To make a long story short, when I hear or read ” It does the job, but it’s not as good as my favorite” or “it’s ok, but I would recommend…” it’s time for me to hit that stop button. Things are either good enough or bad. What you personally prefer is a rather subjective matter, and is often related to your budget and purpose.
The actual review
I stated already that this would be an alternative review, just writing down my thoughts, and revealing the purpose of the entire build.
With no brand preference in mind, the GT Omega Prime Cockpit was a great solution as a starting point for my new rig project. I needed a sturdy base chassis that would lend itself to be expanded with custom parts and hardware. Also, the measurements would have to make it easy to implement my Next Level Racing V3 motion platform. Admittedly, most offerings would comply with these needs, but for those who have to dig into their wallet, the GT-Omega Prime would be a great choice. Not the only choice, but definitely one that will deliver the value for the money.
When I received the package, all profiles and accessories were neatly packaged in bubble wrap. No complaints here. I am sure the same goes for most products on the market. I decided to not publish the commonly used unboxing ordeal, since this would be of no use whatsoever.
The assembly of the rig was pretty straightforward. The concept of a T-Slot connection is simple and easy enough for anyone to understand. The Prime cockpit came with simple, yet easy-to-understand build instructions. That said, I am sure most people would succeed in assembling the unit without the need for the manual.

While the assembly was pretty straightforward, keep in mind that it will take some time to finish the build. Laying out all the parts in an ordered fashion will speed up the build process.
A small detail that might be of interest is that GT Omega decided to use 160x40mm aluminum profiles with a deep groove. Therefore, to easily work with these grooves, they use T-slot nuts that are fitted with a spring plate, instead of the most commonly used ball-bearing versions. That said, both versions of the nuts are perfectly compatible with the profile.
As far as accessoires go, the GT Omega Prime comes with an adjustable pedal plate and a massive steel wheel deck. Also included is a mounting plate for your shifter and / or handbrake.


The assembly
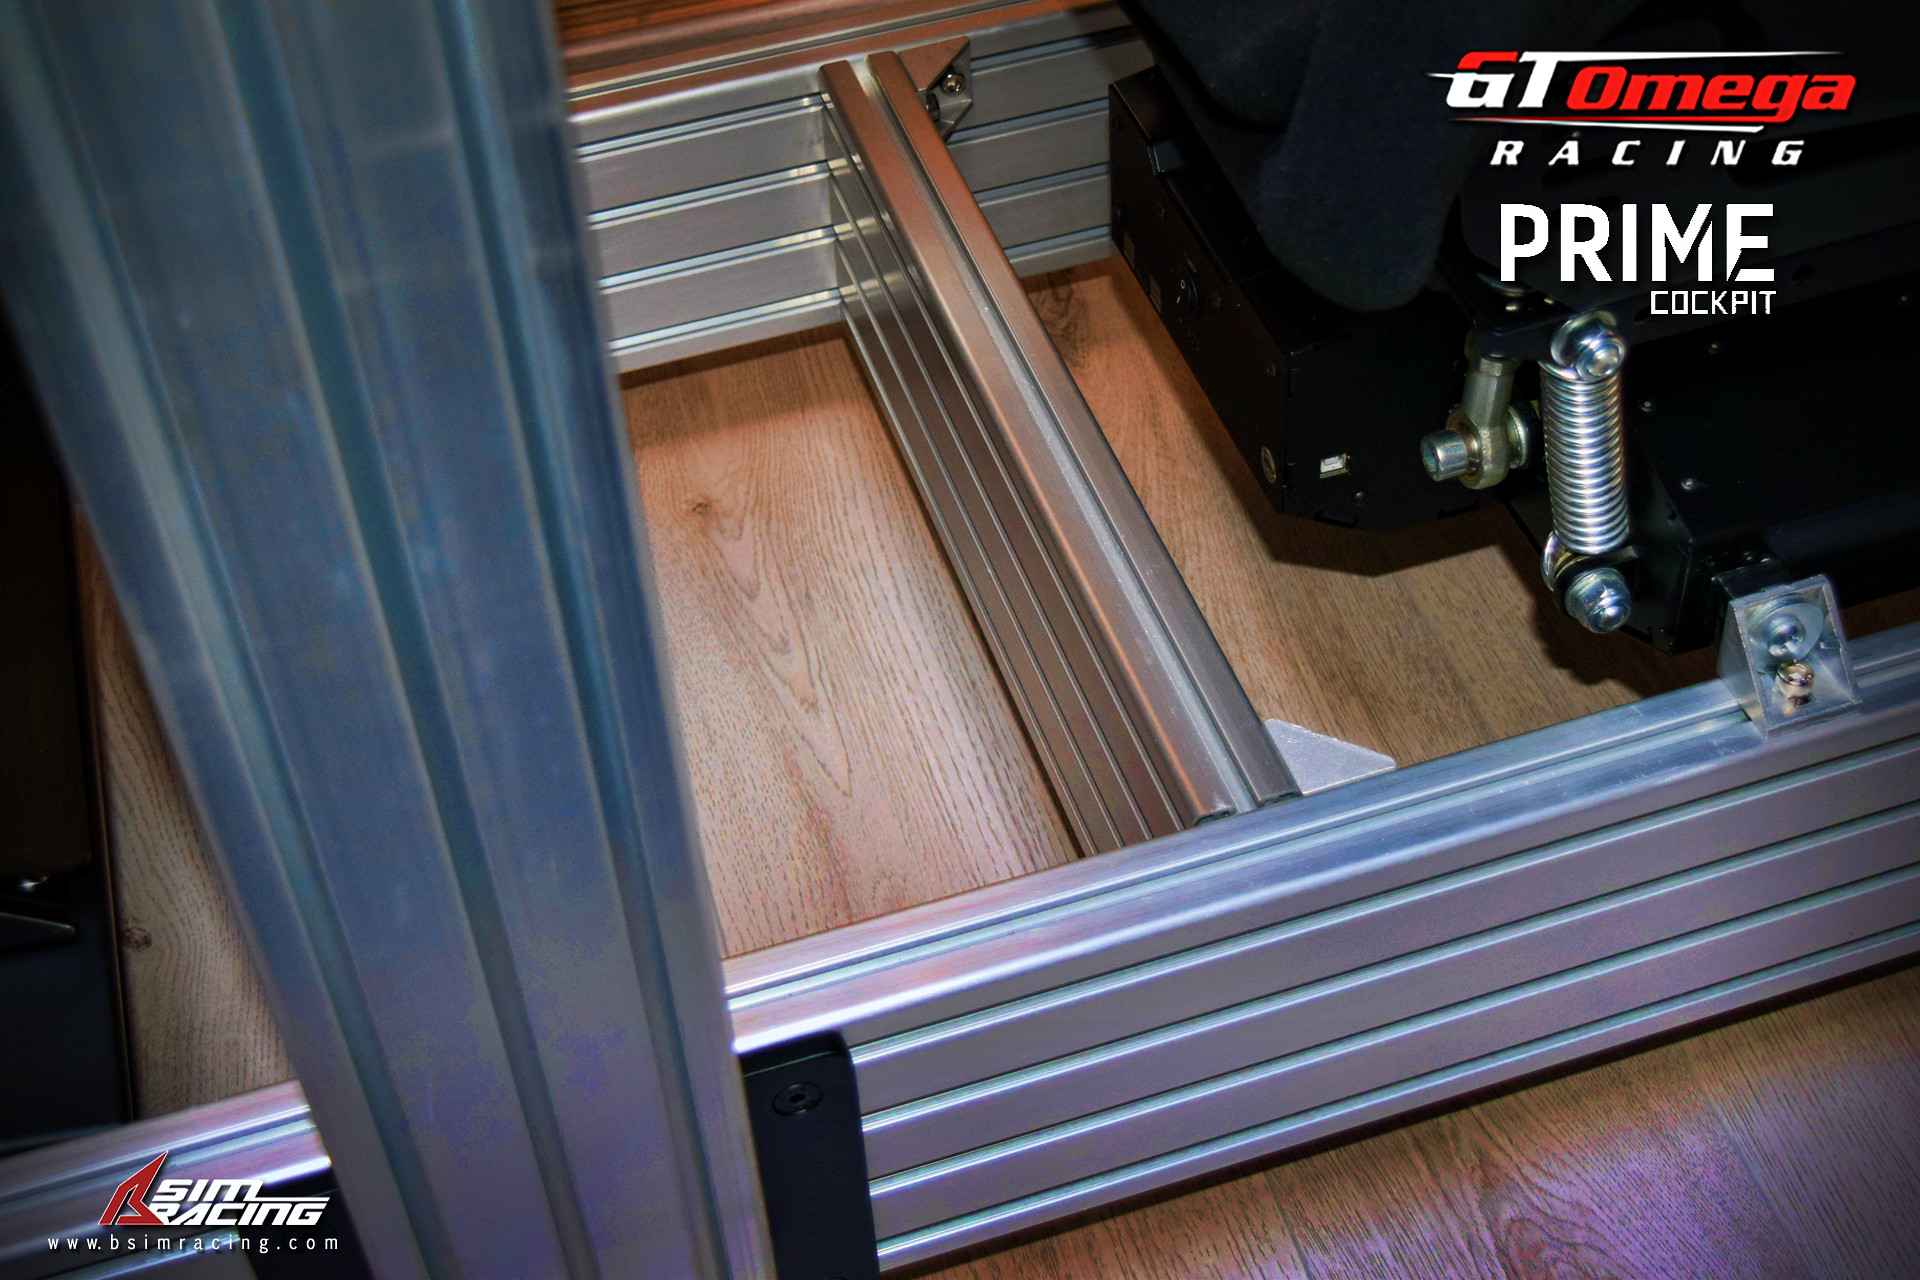
The base platform exists out of two main 140cm long 160/40 profiles and two 50cm 160/40 cross-sections. which make up the lower part of the chassis. I have seen people reporting having 60cm long cross-sections. However, the pre-production cross-sections I received are 50cm long. For me this was the perfect length, resulting in a chassis width that accommodates my motion platform, and has let me fit the motion base without the need for extra brackets.
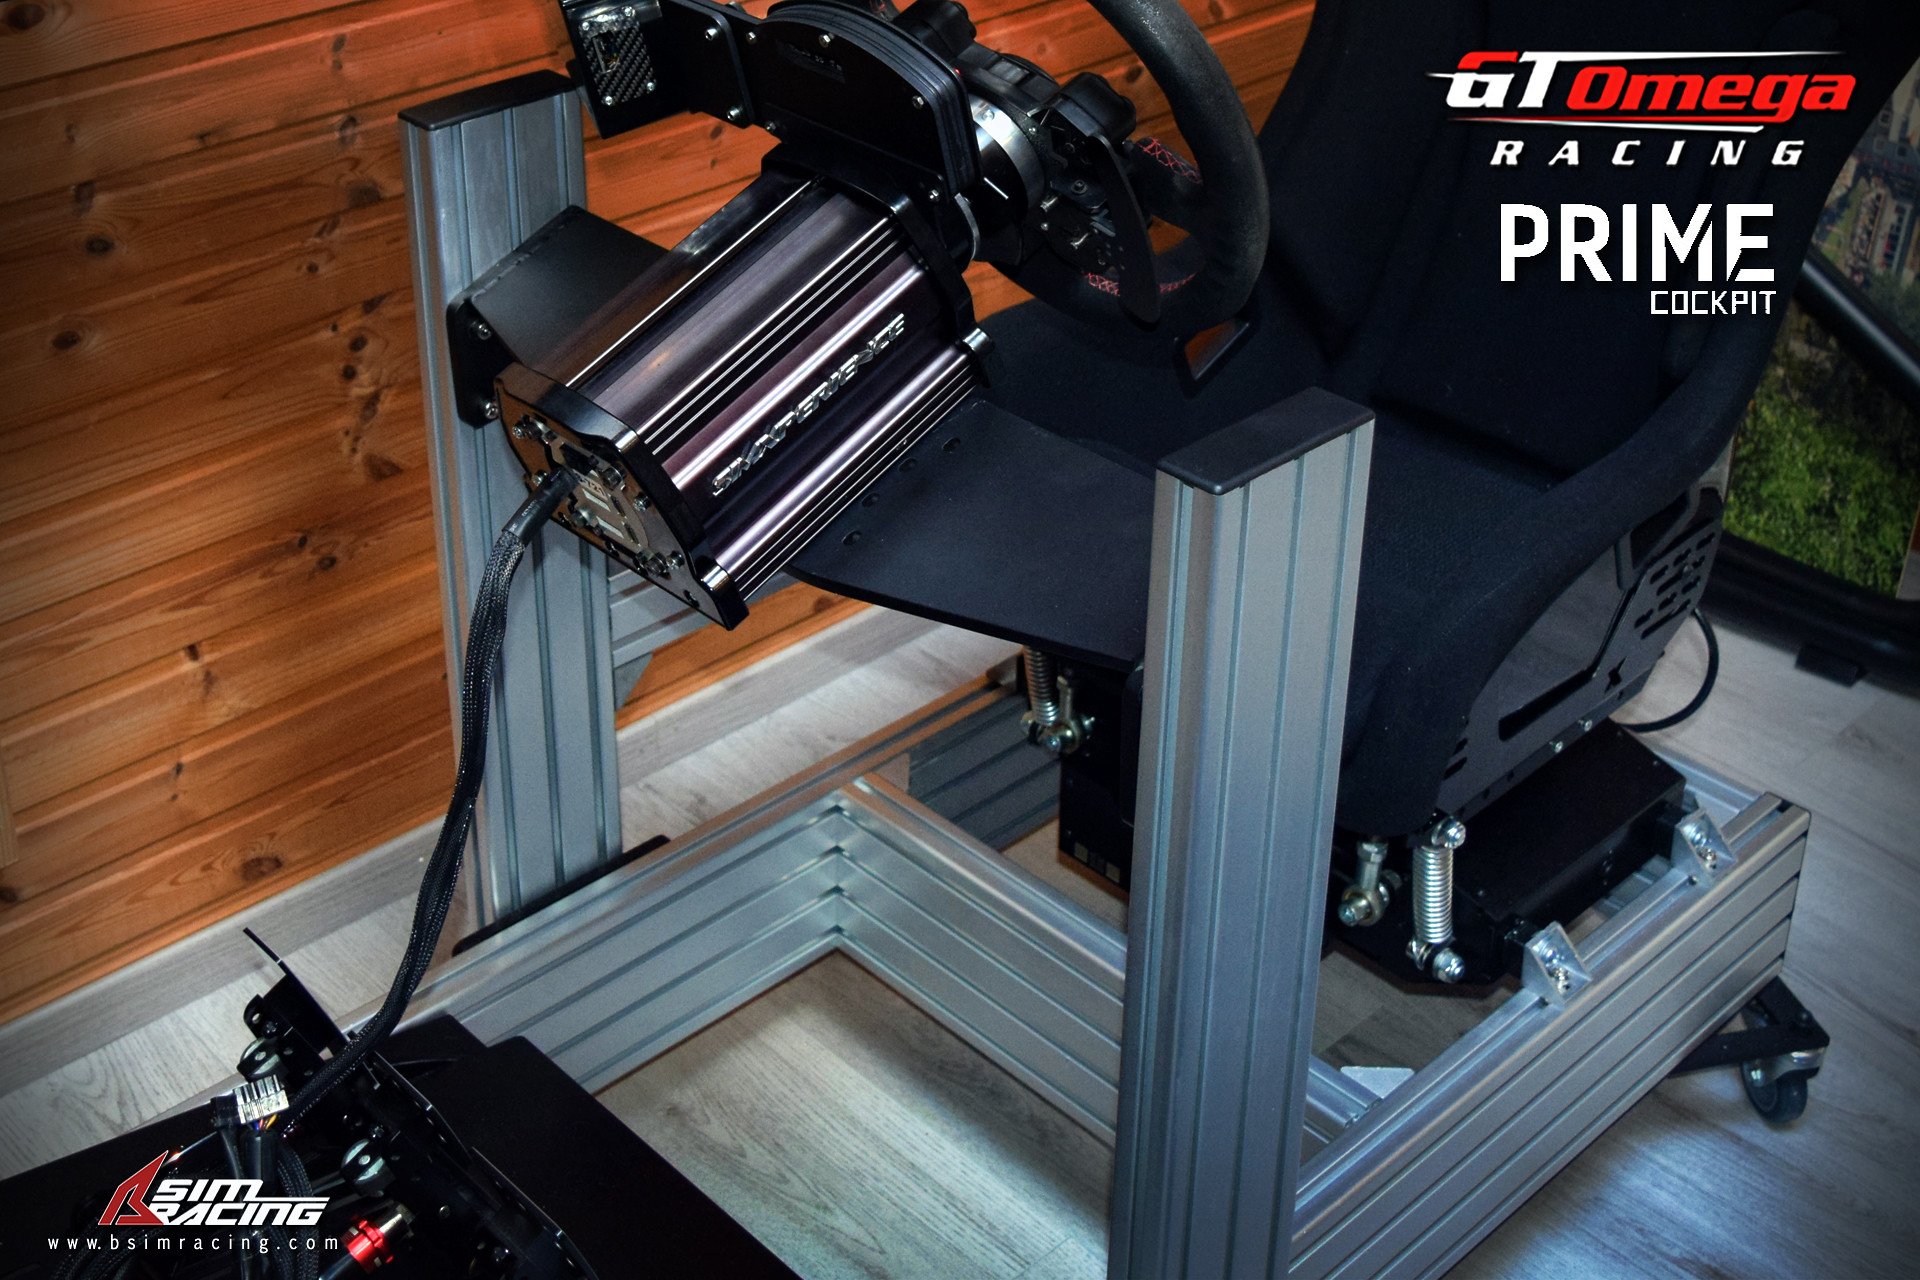
The two uprights that support the wheel mount are 79cm 160/40 profiles. The base chassis and upright profiles are connected via two massive 5mm thick carbon steel bracket plates that house 8 bolts. This results in a bombproof no-flex connection.
Needless to say, the T-Slot system lets you adjust the exact placement of the cross-sections and uprights to your preferred setting.
The 10 mm thick anodized steel wheelbase mounting plate is fitted to the uprights via 4 bolts resulting in a sturdy base. This assembly is more than fine to accommodate just about any wheelbase, including high torque Direct drive wheels. The steel wheel platform is pre-drilled to accommodate the most popular wheelbases on the market.
Mounting the wheel plate is very straightforward, but due to its weight, it can be a little fiddly when trying to adjust the height and the angle. It’s best to pre-mount two T-Slot nuts on the wheel plate and slide them in the profile groove. Then fasten the nuts with the platform on the desired height. It is then easy to set the angle and insert two more nuts to secure the wheel mount in place. As with all other connections, this resulted in a very stiff chassis that does not move a millimeter.
The steel anodized pedal plate is a simple yet effective design, that allows you to adjust the placement, height, and angle. As with the wheel mount, the base pedal plate is pre-drilled to accommodate just about every pedal setup on the market, being both platform mounted and single mount pedals.
I have seen reviews criticizing the stiffness of the pedal plate. However, I have tested the plate with both the Fanatec V3 pedals and the Heusinkveld Sim Pedals Sprint, and could not detect any noticeable flex. ( That said, I have mounted an aluminum profile underneath it to easily accommodate two transducers. While I could not fault the pedal plate in its original form, the added aluminum profile will without doubt stiffen up the pedal plate even more.)
I guess the included pictures are self explanatory, so I will leave it to that .

Besides the wheel and pedal plates, the GT Omega also comes with an extra mounting point for a shifter/handbrake setup. This mounting point consists out of two profiles and a mounting plate. This assembly can either be used on the left or the right side of your rig. As with all connections, the T-Slot design lets you adjust the placement and height to your preferred setting.
That leaves us with 2 40/40 50cm profiles that will accommodate a seat. Because I use a motion base, I did not mount these and used them as speaker mount extensions. ( All will be clear in the latter part of this review.)
Last but not least, GT Omega also supplies some basic rubber feat so you will not scratch your floor, or tear up your carpet. The feet also keep the rig from moving when you are going berserk in the first corner during an online race. You will notice that I decided not to use the feet, and instead mounted wheels. Doing what I do, the rig needed to be fully mobile, so wheels were a must. (At the time of writing, GT-Omega did not yet supply wheels for the Prime cockpit. )
How about a seat?
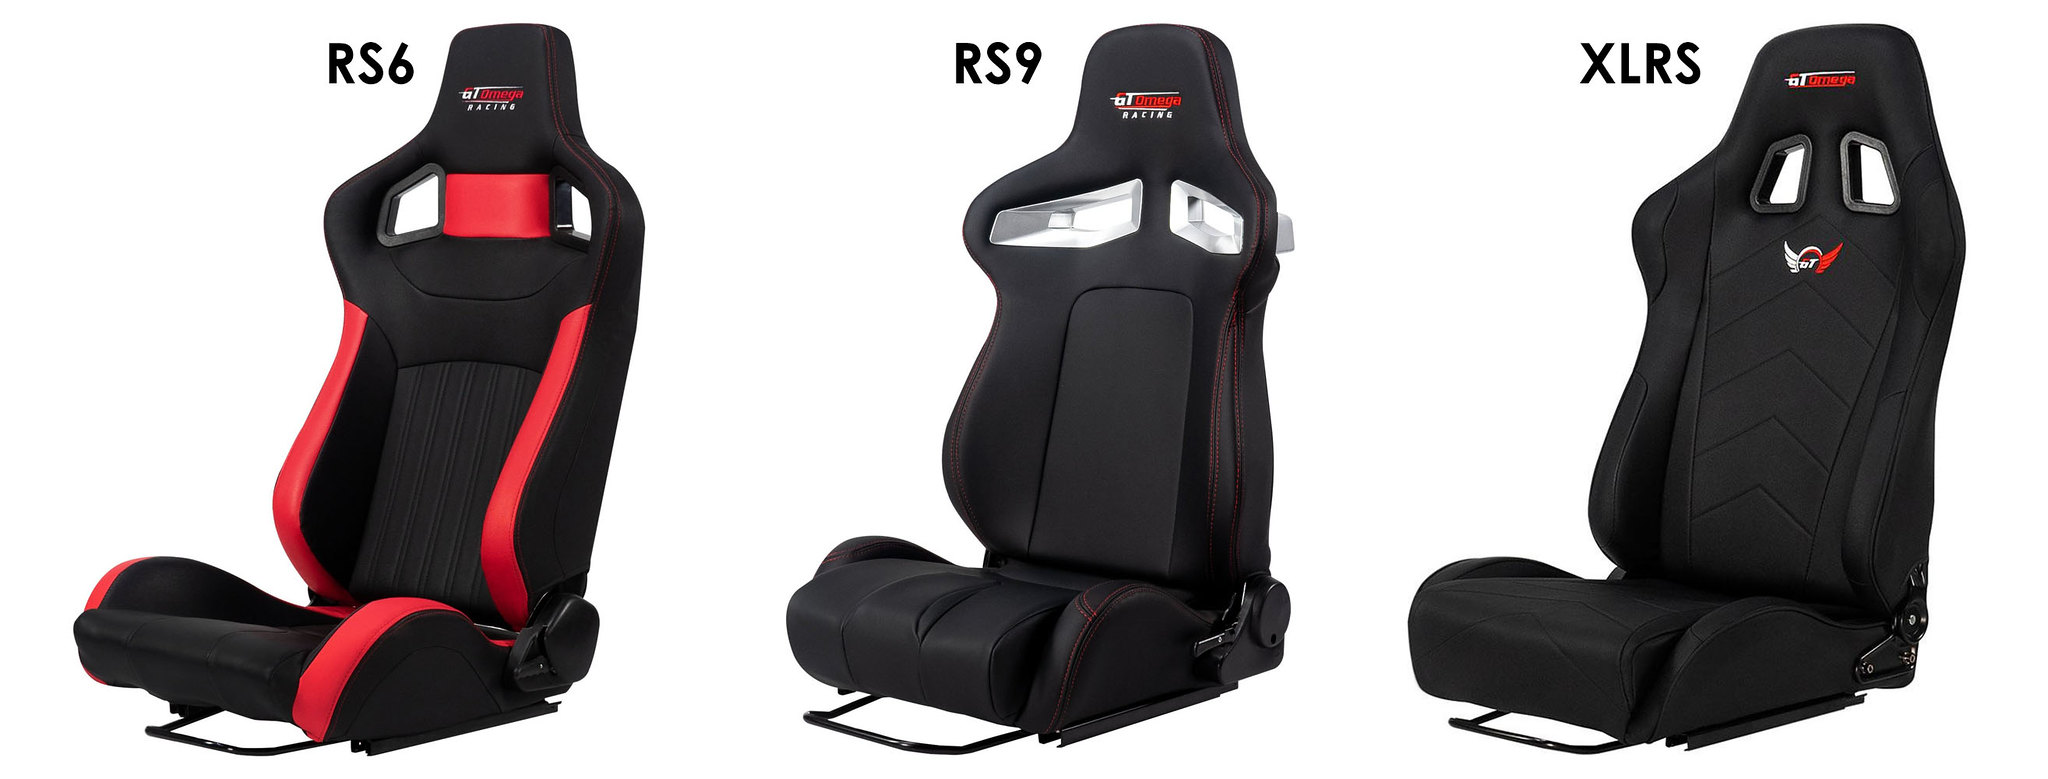
The GT Omega PRIME Cockpit is available without a racing seat, or optionally with one of 3 official GT Omega seat versions. The Prime RS6, The Prime RS9, and the Prime XL RS.
I decided not to use a GT-Omega seat, and fit a separately purchased Sparco Grid-Q racing seat. Call me a snob, but I just like that seat. Although, it can literally be a pain in the arse.
Fitting a seat is as simple as tightening a few bolts. Again, due to the T-Slot system, you can effortlessly line out the included profiles to accommodate the placement of your preferred seat. Place your seat brackets, secure them, and mount your seat. It’s as easy as it sounds.
Ok let’s look at the price.
This one should be the easy part. A price should be something objective, and you will easily be able to decide for yourself if this is good or not. As far as I am concerned these prices are more than fair, and pretty much in line with the direct competition. Since we all know that within the sim racing community everything is deemed too expensive, I will leave this topic for what it is.
- PRIME Cockpit Without Seat – €669,95
- PRIME Cockpit RS6 – €799,95
- PRIME Cockpit RS9 – €819,95
- PRIME Cockpit XLRS – €839,95
Currently shipping is free of cost.
Its all ready… No it isn’t!
So here we are. We have a finished GT Omega Prime cockpit. Until now, all was as expected. I am pretty pleased with the result. No missing parts, good quality material, and the end result is uber-solid and has no flex whatsoever.
My end conclusion is simple. This is a fine T-Slot racing rig, at a competitive price. It is no better or worse than its competitors. I have built and tested 3 different brands of profile rigs. As far as I am concerned they all passed the tests with flying colors. I would have been pleased with any of them.
The main reason I kept the GT Omega Prime specifically as my daily ride, was its color. It was the only one that came in plain aluminum, and I had some spare profiles handy, in the same color. The whole Silver/Red design suited my taste. That said, yours could be different. Also, because this was a pre-production unit, it came in bare aluminum. The retail version of the GT-Omega comes in anodized black, which will most likely suit the majority of users.

Here we go again.
The beauty of a T-Slot rig is the fact that you can adjust and pimp it to your heart’s delight. It grants you the opportunity to dial in everything just as you want it, and you can keep adding and improving the various aspects of the chassis.
As I already hinted, the GT Omega Prime cockpit was the base part of my sim rig project. With the use of my spare parts and some third-party products, I have pimped the rig to accommodate my sim racing hardware and secured a way of adjusting the chassis when I purchase or test upcoming hardware.


To sum up the added parts and features.
I have added a second mounting point to the left side of the rig. Because I like some flight simming now and then. Adding a mounting point on both the left and right, enabled me to hard-mount my Thrustmaster Hotas Warthog Flight Stick and throttle unit.
On the left, I also mounted a keyboard tray that can swing out, making it easy to get in and out the rig. The keyboard mount also houses my second button box.
I extended the rig with a platform on the front, to accommodate the 5.1 surround system subwoofer, the various power supplies, the amplifiers for the transducers, and the needed USB hubs. Furthermore, the platform allowed me to tidy and hide the spaghetti of cables used.
The two leftover 40/40 profiles are used to extend the height of the rear speakers. I did not want them smack in my ears, but also not too low to lose all sense of surround. The 50cm profiles that were not used for the seat mount, did the job. Both the front and the rear speakers are mounted via third-party speaker mounts.
On the side, of the front platform, I hard-mounted a multi-power socket that houses all the power connectors. The front platform is also used as the base for a simple custom monitor mount, holding both the 49-inch widescreen and the 27-inch data screen. The Ultrawide screen is mounted solid, while the data screen is on a monitor arm to let me adjust its orientation.
The upright monitor mount profiles also house the front speakers and the center speaker of the 5.1 surround system.
Last but probably not last in the long run, I mounted a diamond plate floor platform in between the pedals and the seat. Partly for comfort, partly for show.
The whole idea behind this build was to end up with a fully equipped racing simulator that was contained in a one-part easy to move chassis. Needles to say, I am pretty pleased with the end result. Unplugging only 4 cables in the front, lets me freely move the entire rig around the room. perfect for those cleaning moments, or when I come up with the next addon. 🙂


The conclusion
The GT Omega aluminum Profile PRIME Series Cockpit is a fantastic basis if you want to create your own cockpit design, and end up with a modular, very rigid, highly adjustable, chassis that is future-proof.
I could not find any faults or shortcomings, but I am sure that certain individuals in the community will point out a number of them while picking their nose and mentioning a number of brands. 🙂
All in all, a very solid product, that I can recommend to anyone on the hunt for an affordable T-Slot sim rig. As I stated before, it will not be better or worse than its competition. It does what it has to do, or should I say it does what it can do. After all, A T-Slot profile does what a T-Slot profile does.
Official Webpages – www.gtomega.com