Sym Projects – Introducing the Controller Pro-Gauge.
|
SymProjects is revealing its latest peace of kit. The Pro-Gauge.
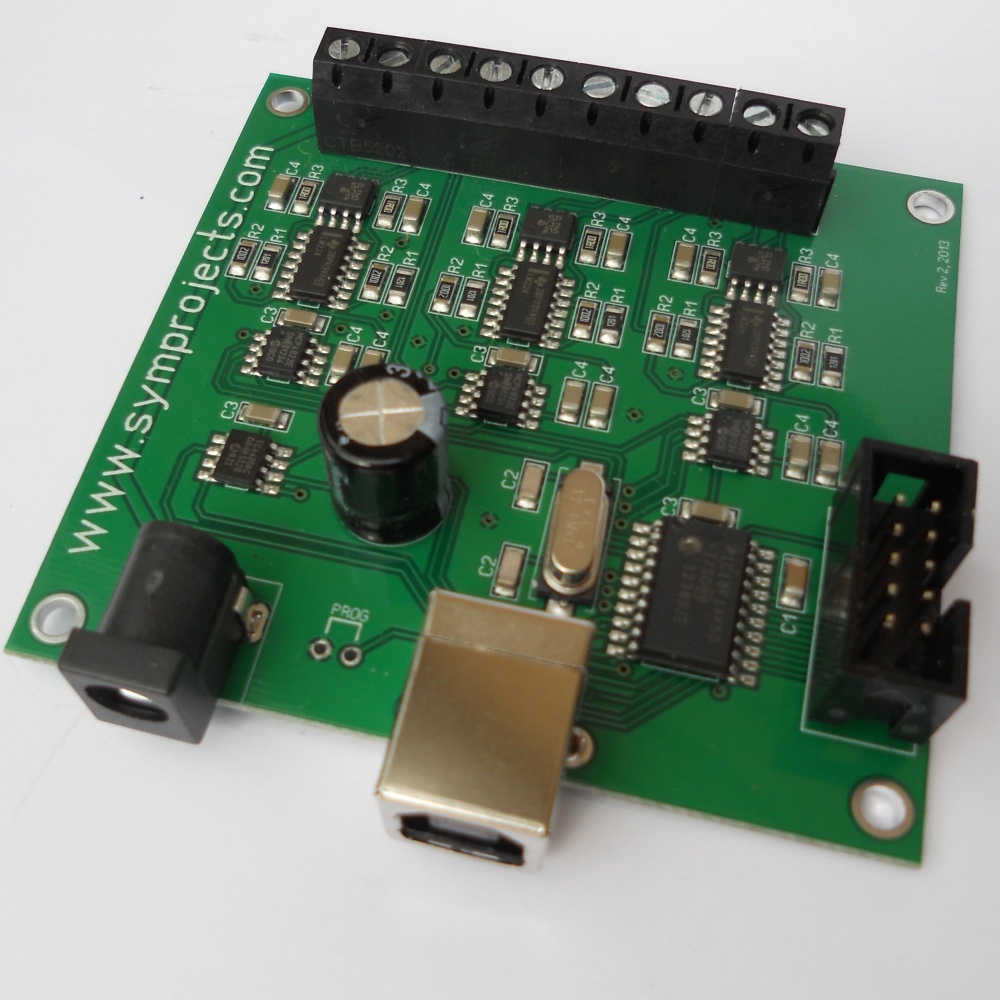
The Pro-Gauges controller is the latest addition to the Symprojects’ range of products. It makes possible to interface your computer with a wide range of real car instruments, through the USB port.
The Pro Gauge Controller is retailed for £49.50 without power supply, or £53.50 with the power supply included.
At the moment the list of supported instruments is:
- – Rev counter
- – Electronic speedometer
- – Fuel level gauge
- – Water temperature gauge
- – Water pressure (electronic) gauge
- – Oil temperature gauge
- – Oil pressure (electronic) gauge.
- – One more output is available for future upgrades.
Configuring the rev counter
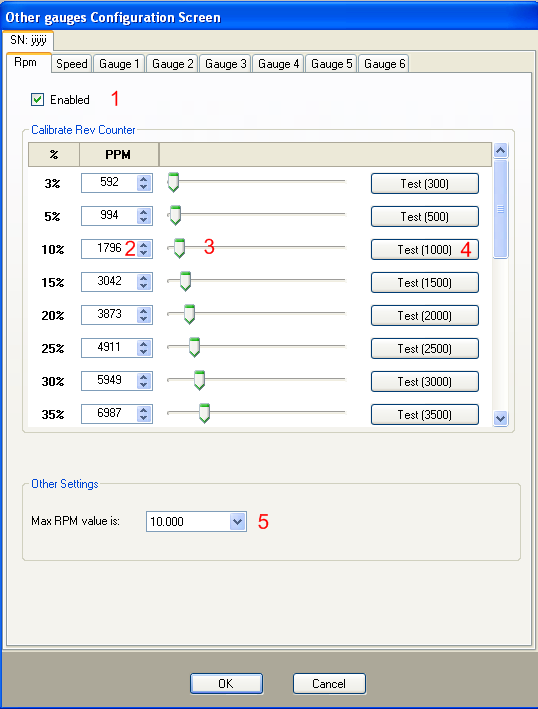
The picture above is the configuration section for the rev counter. the signal wire from the rev counter must be connected to the RPM terminal on the Pro-Gauge. the power and ground wires connect to the 12V and GND terminals respectively,
For the configuration, follow the these steps:
– Enable the output that drives the rev counter, clicking the checkbox marked with 1 in the picture above.
– there are 21 sliders to adjusts. Each slider has to be moved until the needle of the rev counter indicates the value displayed on the TEST button. For example, in the picture above, the slider marked with 3 has to adjusted until the rev counter display the value 1.000 RPM. For fine tuning the UP and DOWN arrows of the numeric textbox marked with 2 can be used. In the section marked with 5, set the maximum value of RPM for your specific rev counter.
Configuring the speedometer
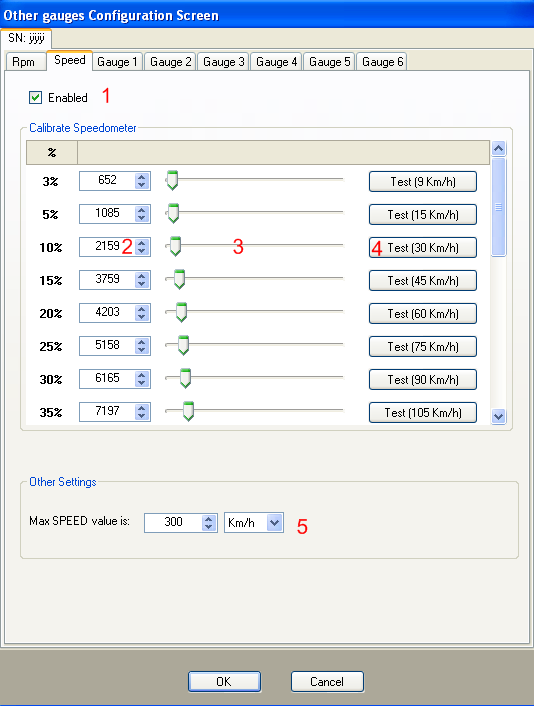
The configuration section for the speedometer is in the picture above and is very similar to the one for the rev counter. Each slider has to be adjusted until the needle of the speedometer moves the speed value displayed in the TEST button on the right of the slider
In the picture above for example, the slider marked with 3 has to be moved until speedometer displays the speed 30 Km/h.
The section marked with 5 indicates the maximum speed of the speedometer.
The signal wire from the speedometer connects to the controller’s terminal marked with SPD. The 12V and ground wires connect to the 12V and GND terminals.
Configuring the other gauges
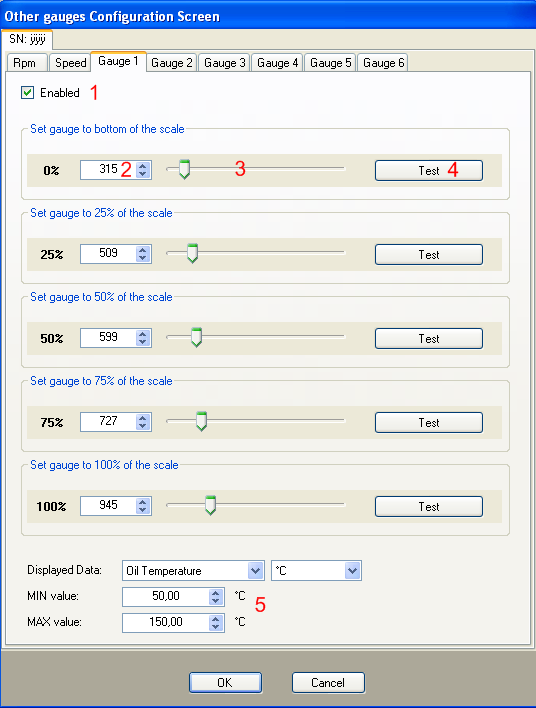
The gauges indicating water and oil temperature, fuel level and pressure and oil pressure must be configured using the section above.
There are 4 sliders and each one has to be adjusted until the gauge’s needle moves to 0%, 25%, 50%, 75% and 100% of the range.
The section marked with 5 in the picture above is used to set what type of data is displayed by the gauge, the unit the data is displayed in and the minim and maximum values of the gauge.
The signal wires from the gauge connect to the S1…S6 terminals of the controller. the 12V and ground wires connect to the 12V and GND terminals.
Power supply
The Pro-Gauge controller requires a 12V power supply, that can be ordered with the controller.
The power supply that we have in stock is rated at 1A maximum, that should be enough to power a rev counter, a speedometer and few of the smaller gauges.
In case you prefer to use your own, you can connect it to the black DC connector close to the USB socked. In this case you have to check that the central pin of the power supply jack is the positive (12V). This is important because otherwise the controller could be damaged.
Alternatively, the 12V and ground wires from the power supply can be connected directly to the 12V and GND terminals on the other side of the board. Again, double check you don’t swap the 12V and ground wires.
| Official Webpage – http://www.symprojects.com |